Thursday, 28 April 2011

Growing in late April

28/4/11

The last week of warm sunny weather with the odd shower has really made the garden burst into life.
It is near... well actually it is perfect growing conditions and long may it last!!
In the greenhouse the sweetcorn that I sowed in my home-made newspaper pots at the start of last week has started to sprout up to my delight, i'm actually getting excited at the though of having the fresh corn cobs later in the summer!!

Also in the greenhouse the courgettes are just about ready to be transplanted out which is a lot earlier than last year but they look strong and healthy enough, i'll just have to harden them off for a few days first though.


Outside the Onion bed is growing well, everyone of them have sprouted and the salad bed is going great too with the spinach and rocket needing thinned out now at the weekend.


Spinach, rocket and runner beans which will grow up the trellis 

I had my brother Carl, his wife Denise and 4 kids Chris, Aaron, Niamh and Michael (and Benny&Izzy's pup Tilly) down visiting for the long Easter weekend so I spent most of my time in the kitchen cooking. This left Ciara to transplant the runner beans out and to do some weeding with the help of my niece Niamh and nephew Michael

Niamh & Michael (or Calvin from Calvin and Hobbs)
Something else i'm rather excited about is that from what I can tell I think we will get some pears from our 2 pear trees. the blossom has gone and there looks to be the signs of fruit appearing


The strawberries and raspberries are booming, as to is the pea shoots. they are nearly reaching the first run of the arch that they will grow up


We got to harvest some of our radishes over Easter and put them in a few salads along with spinach from the greenhouse. The radishes give a lovely peppery flavour


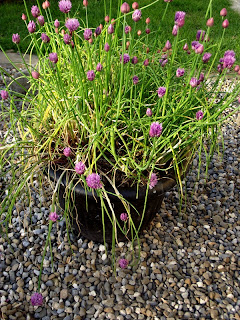
And my herbs are flying it, even the ones that were planted in patio containers from last year and the chives are producing their gorgeous (and tasty) purple flower


All in all everything is growing beyond expectations with the exception of the red cabbages which got wiped out by the slugs (oh well we can start again). There is a bit of weeding needed this weekend but its just any excuse to be out in the garden!!




Tuesday, 26 April 2011

Bangers and mash!!

Garlic & sage sausages with horseradish mash


When I think of sausage and mash it takes me back to my childhood when I wasn’t adventurous enough to try anything out of the ordinary. Still it will always be a comfort meal to me although as a kid I would have smothered it in baked beans or ketchup! This is my new way of cooking it adding a bit of kick. It goes lovely with red onion gravy and braised red cabbage.


Serves 4:

800g of floury potatoes
16 pork sausages
150ml milk
40g butter
3-4 cloves of garlic
1-2 sprigs of fresh sage
Olive oil
1-2 tablespoons of horseradish sauce
Sea salt & black pepper

Method

  1. Preheat oven at 180Âșc

  1. Separate all the sausages from each other and pack them side-by-side on an oiled baking tray and drizzle with olive oil. Finely chop the garlic and sage leaves and sprinkle on top of the sausages pushing some lightly in between. Season with salt and pepper and bung into oven.

  1. Place your peeled potatoes into a saucepan and just cover with cold water, add a pinch of sea salt. Place saucepan on hob and turn on to high heat and bring to the boil. Turn heat down to medium for 10-15 mins. Check with a fork, if the fork stabs through easily they are done, if not leave for a few more mins until it does. Drain into a colander in sink and let stand for a few mins. Place back into saucepan and cover with a clean tea towel.

  1. After 30 mins in oven the sausages should be coloured on top and cooked through, remove onto a clean chopping board and cut each sausage into thirds and place in a serving bowl with a few leaves of sage for affect.

  1. Mash the potatoes thourghly before adding anything. Mash in the horseradish and butter and gradually add the milk to your liking. Season with sea salt and crushed black pepper.

  1. Serve and enjoy the flavour combination. 

Red onion gravy

Very sweet gravy that goes with any roast meat. It also freezes well if you have managed to keep some over.

Serves 4:

4 red onions
5 tablespoons of balsamic vinegar
Knob of butter
2 stock cubes
Sea salt & black pepper

Method


  1. Finely slice the onions and put them into a saucepan on a medium heat. Sweat the onions for about 15 mins.

  1. Turn up the heat to full and add the balsamic vinegar and stir until it has dissolved. Turn heat back down again and add the butter. Season well.

  1. Make up 400ml of stock and add to saucepan. Bring to a simmer for 10 mins then it is ready to serve.


Tuesday, 19 April 2011

Roast Leg of Lamb Stab-stuffed with Garlic Rosemary and Anchovy


Roast Leg of Lamb Stab-stuffed with Garlic Rosemary and Anchovy

Lamb is my meat of choice right now. The flavours that come of a leg roasted like this is second to none! Rosemary and garlic are classic flavours with lamb but the addition of the anchovy just brings an extra sweetness and salty spike. This is terrific with my homemade mint sauce.

Serves 4:
1x2.5kg leg of lamb
2 large onions
2 carrots
2 sticks of celery
50g tin of drained anchovies
7-8 cloves of garlic
Few sprigs of rosemary
Olive oil
Sea salt & black pepper
               

Method

 Remove the leg of lamb from the fridge a half hour before you start. Preheat oven to 180°c. Peel and cut the onion into thick wedges and roughly chop the carrots and celery, set aside.

Pat dry an anchovy fillet and wrap it around a halved garlic clove and a cut piece of rosemary then stab the lamb and push it into the hole. Do this all over about 15 times.

Drizzle over a little olive oil and season well, place in roasting tray with the selected vegetables and bung into the oven for 1 hour- 1 hour 15 minutes basting once or twice, until meat is tender.


Let it rest out of the oven for 15-20 minutes before carving, there is no real technique to carving. I stand it up holding the bone and cut off in thin slices.


Saturday, 16 April 2011

Nettle Soup!

Nettle Soup

Nettle soup is such a lovely flavoursome soup and lets face it the main ingredient is free!!
Young nettles are so sweet and this time of the year the countryside is full of them, plus nettles are full of iron which is great for your blood. Use only young nettles or the tops of bigger ones and i'm pretty sure i dont have to remind you, but, wear gloves while gathering them!!


Tip: If you have a patch of nettles and they get too big and old, hit them with a strimmer or lawnmower and young nettles will be up in days so you can enjoy this soup all summer long.


Serves 4-6:
Half a carrier bag of nettle tops or young nettles
2 carrots chopped
2 medium red onions chopped
2 celery sticks chopped
1 clove of garlic
A pinch of nutmeg
Sea salt and black pepper
A knob of butter
1 litre of chicken stock
3 rice cakes 
2 tablespoons of creme fraiche 

Method

  1. Wash the nettles thoroughly and cut out any thick stalks. (again wearing gloves)
  2. Melt the butter in a saucepan and sweat the onions, carrots, celery and garlic until softened just. 
  3. Add the stock and the nettles and bring to the boil for 5 mins until the nettles are tender, season with the salt, pepper and nutmeg.
  4. Puree the soup in the blender in 2 batches until smooth.
  5. Pour back into a clean saucepan and return to a medium heat add the creme fraiche and stir until incorporated, taste and season again if required.
  6. Serve with a little creme fraiche on top and chopped chives or parsley. It can also be served as a cold soup on a nice sunny spring day. 


Friday, 15 April 2011

Mother Hen.... to-be!

One of our hens became broody last weekend and god love her she was sitting on unfertilized eggs and getting awful abuse from the others. I lifted her out a few times and dipped her backside in a bucket of cold water to take the notion off her but she's a stubborn girl (typical) and stomped around the place making as much noise as possible in a complete and utter huff (again typical).
So during the week i called out to a couple i know in Shanagolden that keep poultry and asked for a dozen fertilized eggs which i got no bother along with 2 bantam eggs too. Later that day i got home and put together a run and little house to put the eggs in along with 'huffy puffy' mother hen.

the pick n mix eggs

In the house awaiting mother hen

The temporary run down at the apple trees 

That was on Wednesday night just gone there so on the 4th of May we should have some chicks.. not all are guaranteed to hatch but out of 14 we'l hopefully get 8-10. It was like 'pick n mix' with the eggs so there should be a good variety.

mother hen doing her thing!

Not amused... face like thunder or what!!

As i carried her over from the hen house to the little house she pecked the hands off me... not a bit of wonder she is the lowest in the 'pecking order'!!!

So watch this space for little chicks in 3 weeks time... fingers crossed, its just a pity she didn't go broody earlier as i have my brother, his wife and 4 kids down over Easter... would have been nice for the kids to see the wee chicks. But i am going to give them a few hens for themselves when they are old enough to leave!

Wednesday, 13 April 2011

April's growth!

Salad bed


Things in the garden are really benefiting from the mild weather and April showers. the onion bed is looking healthy and full of growth and i'm keeping up with the weeding which is a help.

Onion bed

The 2 pear trees that i planted just over a year ago have burst with blossom and i'm keeping fingers crossed to see some fruit this year even though i might not use any of it as it could maybe stun the growth. Sometimes patience really is a virtue!

Pear trees

Pear blossom


The strawberry bed is looking pretty full also and ive got a sneaky feeling we are going to be in for a bumper crop this year as already there is an ocean of flowers coming on them. When the fruits start to come on them i'll lay down straw in the bed. This not only keeps the weeds down but also keeps the fruit clean and out of the soil.

Strawberry bed


On the other side of the Greenhouse the raspberry canes are starting to stretch for the sky. We had 10 canes last year but id safely say they have doubled, which we probably should have dug out and planted elsewhere to stop overcrowding but sure this year they can fight to provide!!

Raspberry canes


Inside the Greenhouse Ciara has been busy sowing runner beans and 2 varieties of courgettes in seed pots.

new pots with courgette and runner bean seeds


Also the mint has started to really thrive but unfortunately the slugs made short work of all my cauliflower seedlings in just one night... Grrr... slugs!!! I'm going to take the chance of just planting new cauliflower seeds straight into the ground in the final bed.

mint seedlings 

Elsewhere the carrots are starting to make an appearance in the raised bed and in the herb garden the newly sown chives in the 'well' are starting go grow through now.


carrot seedlings

Chives growing in the 'well'
So all in all im very pleased with the garden so far. still a long season to come... i cant wait!!


Sticky Bacon Ribs

Sticky Bacon Ribs

These ribs are a wonderful snack or a starter for a meal. They can also be started off on the oven and finished off on a Barbecue for that lovely smoky flavour.  Marinade for at least an hour but preferably overnight in the fridge to let all the wonderful flavours combine and infuse in the meat.


Serves 3-4:
1kg of bacon ribs

For the marinade:
4 tablespoons of Olive oil
2 tablespoons of red wine vinegar
2 tablespoons of dark soy sauce
1 tablespoon of fish/oyster sauce
1 tablespoon of Worcestershire sauce
5 tablespoons of honey
1 teaspoon of Chinese 5 spice
1 teaspoon of chopped sage
1 tablespoon of cayenne pepper
A few cloves of garlic whole
A big pinch of black pepper

Method


If the ribs are still in a rack, carefully cut down between the bones to separate.

Mix all the ingredients of the marinade in a mixing bowl, place the ribs in an even layer in a large roasting tray and pour in the marinade and toss the ribs about so they all get coated. Cover with cling-film and place in the fridge.

When you’re ready for cooking, place the roasting tray into a preheated oven at 200°c for 35 minutes, take them out half way through cooking and give them a toss around. You can then finish off on a BBQ or under the grill to caramelise the sticky marinade.


Serve with a side salad and dips or some lightly stir-fried vegetables of your choice.


Thursday, 7 April 2011

Pasta salad

Pasta salad


This is a very quick and simple dish to make up for a healthy tasty lunch. Great for you vegetarians out there too!!

Serves 2:
250g fresh*/dried pasta
1 handful of baby spinach
1 handful of in season salad leaves
1 carrot 
1 courgette
1 small red onion
2 tablespoons of a balsamic dressing
Sesame seeds
Mint leaves shredded
2oz of goats cheese crumbled
Sea salt and black pepper


* If you want to try out fresh pasta look in the 'Recipes' page to see how!!


Method

  1. Cook the pasta in boiling water until tender.
  2. While the pasta is cooking, prepare the vegetables, using a peeler peel the carrot and courgette into ribbons. Finely chop the onion and give all the salad leave a tear.
  3. Mix all in a large bowl and pour over the dressing, combine the pasta and sprinkle over the shredded mint leaves and goats cheese.
  4. season with the salt and pepper and serve.


Tuesday, 5 April 2011

Profiteroles!!!

Homemade Profiteroles


These bad boys are defiantly worth giving a go... not only are they fun to make but u will seriously overdose in chocolate and double cream!!! For those losing weight and watching their figures... my humble apologies!!! 


Serves 4:
For the choux pastry:
2oz of butter
200ml of cold water
100g plain flour
2 beaten eggs


For the cream filling:
300ml double cream
1 teaspoon of vanilla essence
3 tablespoons of caster sugar


For the chocolate sauce:
125g plain dark chocolate
1 oz butter 
A splash of water


Method

  1. Preheat the oven to 200 degrees
  2. Line a baking sheet with some grease proof paper
  3. For the pastry. Place the water in the bowl along with the butter and place on a hot hob and bring to the boil. In the meantime sift the flour into a mixing bowl. Once the water/butter has reached boiling point take it off the heat and beat into the flour until smooth. Set aside to cool for 10 mins. Now beat in enough of the eggs bit by bit until you reach a smooth soft mixture. At this point you can either spoon out the mixture or put it into a piping bag and pipe it into small balls on the baking sheet. Bake for 25 mins and when ready pierce with a skewer to release steam.
  4. For the cream filling simply whisk the ingredients together until it stiffens. When filling cut the pastry half way around and fill with the cream filling.
  5. To make the sauce place the ingredients into a heatproof bowl and put over a small saucepan of simmering water to melt, stir to combine well. 
  6. Serve however you like and pour the delicious sauce over.


Give it a Grow!!

I really gotta stop using these cheesy titles but they just keep coming to me!!
Anyway... I have a feeling that a lot of people would like the idea of 'growing their own' but somehow feel that they cant... whether it be a lack of time, a lack of knowledge or a lack of space. the thing is that anyone and I mean anyone can grow something. Everyone has got a windowsill right??? Well that is a great starting point... get yourself a window box or a few pots, fill up with multi-purpose compost and sow some seeds into it!! herbs is a great starting point, they are a great accompaniment to any meal, look lovely and smell great so they are ideal for a windowsill inside or out! i have one on the go in my kitchen windowsill and have just planted a new one to keep the supply coming as I use them a lot...
They should be up and coming in just a few weeks time.

If you wanted to go a step further and have a little space outside then there is a lot that can be grown in patio pots, old buckets, even an old wellington boot can provide a great growing area for a strawberry plant!!
I have successfully grown herbs, any salad item, courgettes, peas, runner beans, carrots, garlic, onions, shallots, tomatoes, chilli and  peppers in growing containers or old buckets or even more convenient... ready to use grow bags.
A sunny spot and some regular routine care is all it takes and you could be heading out in the summer evenings to harvest fresh home grown produce for your dinner right from your back yard. Now when i say 'regular routine care', I mean the bare minimal effort... a little thinning out at the start and some watering a few times a week... and to pull the occasional weed if it is cheeky enough to grow!!
Honestly folks give it a go, once you have picked the first of your selected choice you'll get that feeling that I get every time I pick something... its a pretty good feeling trust me. And get the kids involved let them look after a plant and it may very well change how they feel about eating vegetables if they were anything like I was growing up... spuds was my veg intake and that was it!! 
When i started growing 2 years ago i had never tasted a courgette until I was given some surplice plants by a neighbour... Ive never looked back since!

If you dont have a greenhouse you can start the seeds of inside, again on a windowsill... you can even make home-made pots which can be planted right into the ground/container. These pots are made from old newspapers... and this is how:

get a small tumbler and fold a sheet of newspaper to a little taller than its size

then fold the excess paper into the tumbler

remove the tumbler and the paper should hold its shape (you can use a little tape if you like)

turn the pot over, now scrunch up another page 

stuff the other page into the bottom of the pot to form the base

fill with multi-purpose compost and its ready for the seed
I spoke on local radio station Clare FM today on The Today Show about making use of all these ideas.
If anyone wants to ask anything feel free to leave a comment and I will respond to all, or alternatively contact me on Facebook or Twitter!! If you dont ask you wont know!!


Monday, 4 April 2011

Thinning out

Yesterday i spent some time in the garden, in between the downpours that is, After a heavy shower and the sun comes out everything looks so green and fresh, everything looks so alive!
I had a few rows of Radishes to thin out to give them more space to grow. it seems a waste to pull out healthy plants but if you didnt the plants dont get the required space to thrive!


Pull out every other one if they have grown close together but carefully so not to disturb the young root system of the ones you want to keep in.


If there is a cluster thin it out to 1 or 2 of the bigger seedlings


Sunday, 3 April 2011

You gotta try this!!

Prawns in Honey and Black Pepper sauce with Garlic and Nutmeg rice

This dish is so full of flavour and the garlic, nutmeg and cinnamon used in the rice just gives it another taste sucker punch! Feel free to just have plain rice with it but if you’re feeling more adventurous then follow this to the end, it won’t let you down.


Serves 2:
12-14 prawns de-shelled and deveined (see ‘cooking&eating’ page)
3 spring onions
1 pepper any colour
150g button mushrooms
A thumb-sized piece of ginger
1 small red chilli de-seeded
Half a cup of rice
4 cloves of garlic
Quarter nutmeg
Half a teaspoon of cinnamon
A glug of toasted sesame oil
A knob of butter
Half a lemon

For the sauce:
2 tablespoons of soy sauce
1 tablespoon of fish sauce
1 tablespoon of honey
Half a tablespoon of olive oil
10 black peppercorns lightly crushed

Method

1.      Start to cook your rice following the cooking instructions on the packet.

2.      Prepare the vegetables, finely slice the mushrooms. Pepper, chilli and spring onions. Finely dice the ginger and   garlic.

3.      Make up the sauce by combining the ingredients into a mixing bowl.

4.      Put a wok onto a hot hob, add a glug of sesame oil and add the ginger and chilli to fry off for a minute before 
      adding the spring onion, mushrooms and pepper, stir-fry for about 5 mins.

5.      When the rice is cooked set aside and put a frying pan onto a medium to high hob. Add the knob of butter and fry off the garlic in it until lightly browned, grate a quarter of nutmeg over sprinkle over the cinnamon, stir 
      in well. Add the cooked rice to this and incorporate well, remove from the heat and squeeze half a lemon over it.

6.      Finally add the prawns to the wok and pour over the sauce and let cook for a few mins just until the prawns turn pink (don’t overcook them or they’ll be like rubber). Voila, you now have a taste explosion waiting to happen!


Related Posts Plugin for WordPress, Blogger...