Tuesday, 28 July 2015

Ham, Brie and cranberry Ciabatta

I've a brand new recipe for the blog today, it is just a very simple but effective flavour combination.I'm trying to gear myself up for a run today but the weather outside is just making me want to stay indoors, cook and eat!!! But I'll tackle it head on, I always feel so much better mentally for having done it.


Ham, Brie and cranberry Ciabatta

This is an amazingly easy and tasty alternative to a regular old sarnie. Serve with some low-fat crisps and a small salad on the side.


Serves 2:
2 Ciabatta rolls
Olive oil
6 slices of good deli ham or ham pulled from a ham joint
About 80g French Brie
Black pepper
2-4 tablespoons cranberry sauce

Method

Carefully cut the ciabatta breads in half lengthways and drizzle the cut sides with olive oil. Lightly toast the cut sides under a medium/high grill. Remove from the grill and add the ham on one side, finely slice the Brie and place over the ham and season with some fresh cracked black pepper. Place back under the grill keeping a vigilant eye just until the Brie starts to melt and blister.
Remove from the grill, spoon over the cranberry sauce and top with the other half, serve immediately.


Monday, 27 July 2015

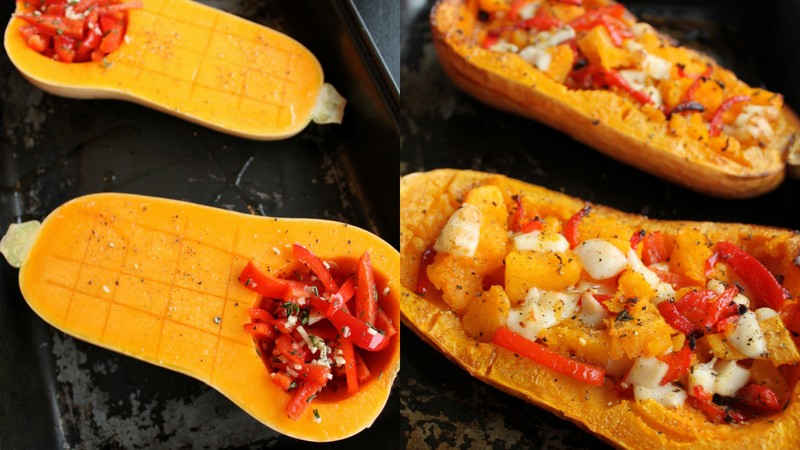
Stuffed Butternut Squash Three Ways

Its Monday 27th July and it looks like its a wet and windy November day outside, but as they say in Ireland... "Irish summers, at least the rain is warmer".
I have just about recovered from last week, I had gotten back into my Strength and Conditioning class for the first in 4 and half weeks and it nearly killed me, my legs where fucked completely... but I have kinda recovered, I'll do a recovery run this morning and get back to squats tonight!
I'm in training for the Dublin Marathon this November so needs must!!

Anyways I'll leave you with this fantastic recipe from the book, Butternut Squash 3 ways... feel free to play around with fillings, I know I do!!


Stuffed Squash Three Ways

This is a great accompaniment to a meat dish or I mainly have it as a lunch or night time flavour packed snack. There is no end to the variations you can have, it’s all about the combination of flavours used in the filling. Here are a few of my favourite ones. In my opinion there is no right or wrong way with flavours, it’s just about what works for you!  

Serves 2:
1. 1 large butternut squash
1 clove of garlic
200g goat’s cheese
2 teaspoons of chopped thyme
Half a red pepper
Tablespoon of honey
Sea salt & black pepper

2. 1 large butternut squash
3-4 rashers of streaky bacon
50g grated red cheddar
Tablespoon of chopped chives
2 tablespoons of peanut butter
Sea salt & black pepper

3. 1 large butternut squash
2 medium onions
1 clove of garlic
Half a yellow pepper
Tablespoon of balsamic vinegar
Sea salt & black pepper

Method
To prepare the squash simply but carefully slice it down the middle lengthways. Spoon out the seeds and soft fibres and brush with olive oil.

1. Finely chop the garlic and thyme and finely slice the pepper. Pop these into the cavity in the 2 halves and place into a preheated oven of 190°c. Bake for 45-50 mins. Remove from oven and scoop out the filling along with about half of the flesh, mash it all together along with goat’s cheese and season well. Spoon it back into the cavities, spoon the honey over the top and bung back into the oven for a further 15 mins.

2. Put the peanut butter into the cavities along with half the cheese and bung into the oven for 45-50 mins. In the meantime fry the chopped up bacon for 2 mins until coloured and crisp. Mix the bacon and chives in with the soft squash when it comes out of the oven, season and top with rest of cheese. Pop the tray back in oven for 15 mins.


3. This time put the squash into the oven just brushed with oil. In a pan sweat off the sliced onion and chopped garlic. Add to this a finely chopped yellow pepper half. Pump the heat up full them add the balsamic vinegar and stir until the vinegar has all but disappeared. When the squash has been in for 45-50 mins take it out and mix the onion mixture with the soft squash flesh, season well and bung back into oven for 15 mins.


Friday, 24 July 2015

Mussels with Bacon and Garlic in Cider

Here is a recipe from my book, I'm really into my seafood at the moment. We are not long back from Rome and Sicily and I think I managed to eat my own body weight in seafood while over there.
But here in Ireland I think a lot of people shy away from fish and seafood, I used to be just like that years ago before I got into the whole "cooking" thing. But right now I think its my favourite thing of all time!
We are, after all, an island... surrounded by water, surrounded by fish and seafood, we should really embrace it like the Sicilians do. Locate a good local fish/seafood supplier, a good fishmonger will do all the hard work for you like boning, filleting, scaling etc.
The flavours, the combinations, the health properties, the fact that it is practically on our doorstep and should always be in fresh supply should be reason enough to give it a fair go... after all, there is plenty more fish in the sea!!! (Puntastic, I know) :)


Mussels with Bacon and Garlic in Cider

Give the mussels a clean up if they need it, if the look gritty or have little beards just wash them in cold water and pull their beards off before cooking then so it won't affect your sauce.

Serves 4:
500g mussels scrubbed and de-bearded
2 large shallots
3 cloves of garlic
3 tablespoons of oil
A few sprigs of thyme
100g of smoky bacon chopped
250ml of cider
Homemade bread, few garlic cloves and olive oil
2 tablespoons of crème fraiche

Method

Finely chop the shallots and garlic.

Heat the oil in a large saucepan and add the shallots, garlic and thyme leaves and sweat for 2-3 mins, add in the bacon and cook for a further 2 mins.

Drop in the mussels and leave for 2 mins then add the cider, cover with the lid and shake around for a further 3 mins until the mussels have opened.

In the meantime slice the bread and rub with half a clove of garlic, drizzle with olive oil and toast on a high heated griddle pan.

Remove the mussels from the pot, leaving the juices. Add the crème fraiche to the juices and place onto a high heat stirring for 2 mins.

Separate the mussels into their bowls and divide the sauce over each portion and serve with the bread on the side.


Monday, 6 July 2015

Cooking without the Bull!

Cooking Without the Bullsh!t


I've been out this past few months suffering with depression and anxiety problems again... the black dog doesn't want to be healed I guess but for now he has heeled... "Sit boy"!!! But I have had time to think about the future and what it holds for me as a 'foodie' if even it has a future.But I've decided to keep moving forward with it, but only how I feel I should, not how everyone else see's I should be doing it. This started out for me as a release from the depression, not to start a new career... somewhere along the line it has swayed that way and I'm very grateful of it, but also somewhere along that same path I tried to fit in with others thinking and portrayals... but screw that, from now on I will do it my way, its how I started and how I began to get a lot of wonderful followers. A lot of people I've worked through have tried to change me... tame me, but sure I don't want to be another cog in this machine of Irish food, that's not me, I don't just fit in!

Is it just me or has the world of cookbooks, cooking shows, celeb chefs etc.including myself all got a little repeatable? Everything has gone down the path of ‘quirky’ and ‘oh, we eat with our eyes’… yes we do first eat with our eyes and visually nice looking food is really appealing but it has become shoved into our faces, and I for one got totally sucked into it all.


My short story (for those that don't know) is this; I was a plasterer by trade, I had a successful plastering back home in Co. Armagh in Northern Ireland but when the recession hit my business ended and I got into a shed load of debt. I then moved to Co. Clare to start over, it is down here that I started growing my own fruit and vegetables and fell in love with cooking and food in general.  From this I started a food blog, became a ‘food blogger’ (shudders) and got sucked into all the pompous bullshit that goes with it. But now I’m sick of it… the pompous bullshit that is, I’m still in love with food, love cooking and love eating, but this idea that everything has to look like ‘Art’ on a plate or look like something from a 1950’s kitchen is getting out of hand. For everyday cooking you would spend more time using props and making the food look un-natural that it would be stone cold by the time you eat the fecking thing let alone probably have a few screaming kids hanging off you that you would be ready for the mental ward!

Now I’m not saying that every cookbook is like this or every ‘food blogger’ (shudders again) serves up this kinda grub but as I say it is so easy to get sucked into all the bull! I would rather serve up real food in a real manner, not ‘art’ or not slop on a plate either… I mean food can still look nice, neat and appealing but it doesn’t have to have water cress leaves placed individually in a pattern or drops of lobster foam to represent the blah fecking blah… That’s for eating out in expensive restaurants and even for special occasions at home, not for realistic people with everyday lives feeding their family after a hard day’s work, and if you don’t agree with me you may close the book now cause it isn’t getting any prettier.

I have become a ‘food blogger’ but by God I hate the title, I love food, write and blog about it but end up with a title and being tarred with the same brush as everyone else. I cringe when I see other food bloggers put up a picture of their dinner and it looks so set up so staged… a plate from the early 1900’s, a portion of food that wouldn’t give a 8 month old wind and a glass of wine poured and some herbs and spices laid out on a little dish beside it. I’m thinking… ‘Really?? Is that something you just rustled up for yourself??’ As I said I have done this myself too but it hasn’t been real, I would have cooked something to look good, spent 20 minutes setting up the shot and then 10 photos later trying to sus out the better one from them. Then plant it up on a social media site with some ridiculous caption like ‘Nom, nom, nom’ waiting for people to tell you how wonderful it looks when really most are thinking ‘Jeez he didn’t have much to do today’!!!


What I want this blog to be is real food, easy to follow information and recipes and the main thing is not to sound like a condescending asshole. On the other hand I don’t want to sound like ‘Gordon Fucking Ramsey’ and think I must swear after each word but I am writing this how I would like to read it… no one else, but how I would like to read it because I have found that once you try to do things the way you think others would like it then you are not being true to yourself and it becomes bullshit!

I have to think of what the everyday man, woman and child wants when it comes to cooking and yes there are lots out there that want to make the ‘art’ type food but it’s not practical for every meal you cook. Sometimes you flick through a cookbook and end up feeling bad about yourself, nearly doubting yourself… you see a picture of how the food ‘should’ look like and think that you wouldn’t have a mission of making a dish look that good. A cookbook or blog shouldn’t make you feel like that, a good cookbook/blog should make you feel that you can, it should make you feel like giving it a go otherwise the author may as well say ‘I came up with this dish one day while blah blah blah, have a good look, you will never be able to make it mwhahaha’.
 I do think my Book though was done in the manner how I want to continue... everyday food that looks appealing and is easy to make. So here is to the future... honest food, a bit of banter and a fresh approach. All comments are welcome and I'll reply to what I can.

Anyone can cook and anyone can cook really well, for me flavour combinations and imagination is so much more important than the visual outcome. So if you want straight talking and good food then welcome to my world, come on in and throw the weight off your feet.


Tuesday, 31 March 2015

Roast Butternut Squash and Goats Cheese Salad

Forgive me Father for I have sinned... It has been a month since my last blog post...

And what a month it has been, I've been up the walls with wedding and birthday cakes, cookery demos and a TV appearance on the new evening show on TV3, The Seven o Clock Show. So I think I'll get away with just a few Hail Mary's for my penance.

I'm gonna cram a lot into this post, show some of my recent cakes, the video of my TV appearance and finish you off with a new recipe I've been working on... as usual it is simple but effective!

So here are a few of the wedding cakes I have made in the past 4 weeks..


And then some birthday celebration cakes I made too...

Clare hurling themed cake

Game of Thrones dragon Mother cake

Disney's Frozen castle themed cake

A cake for Hayley on the red carpet with Harry Styles from One Direction

A confirmation cake for my niece Eve..

Eve's Confirmation cake

And finally a cake that I designed for a class I'll be teaching in sugarcraft for teenagers...

Up, up and away cake

Then I had a brilliant night in Bruree, Co Limerick doing a fund raising cookery demonstration to a fantastic packed house at their local community center.

Last Friday night I had my debut on The Seven o Clock Show on TV3, Anton Savage and Mairead Farrell took over the presenting duties on the night form Lucy and Martin whom I'd been used to on Late Lunch Live where I used to cook on. The guest on the night was Keith Duffy from Boyzone fame and later Coronation Street fame... Here is the clip where I made them my famous After Eight Cheesecake


So lastly here is the recipe I promised, it is a very handy one.

Roast Butternut Squash and Goats Cheese Salad

Such a simple recipe but a great lunch/lunchbox filler or a side to a meat or fish dinner. serve with the squash warm or cold... either way works beautifully! The goats cheese is rich in calories, it can be swapped for cottage cheese which is significantly less calories as you can see by the calorie count below.


Calories 1014
507 per portion
or
Calories 822
411 per portion
(if swapping for cottage cheese)
Serves 2:
1 small butternut squash
Rapeseed oil
A large handful of fresh rocket
A small handful of coarsely chopped walnuts
A small handful of dried cranberries
90g goats cheese
Balsamic vinegar dressing

Method

Preheat the oven to 180c.
Carefully cut the squash lengthways down the middle as scoop out the seeds and membrane with a spoon. Chop the halves into bite sized pieces. Place on a roasting tray and lightly drizzle with oil and give a light seasoning with salt and pepper. Roast in the oven for about 40 mins until softened. 

In the meantime wash and spin dry the rocket leaves, chop the walnuts if not previously done and if you like you can re-hydrate the cranberries in some boiled water for a few mins and cool them again.

In a large bowl add the rocket, squash, walnuts and cranberries. Give a light drizzle of oil, using a knife break off knobs of goats cheese. give a mix around and divide onto 2 plates, dress generously with the balsamic vinegar dressing and serve.


Tuesday, 24 February 2015

Lush Vegetable Yellow Curry with Garlic Griddled Bread

Lush Vegetable Yellow Curry with Garlic Griddled Bread

This is such a simple recipe to make up, you can go to the bother of making your own curry paste if you like but I find that the shop bought jar works just as well here. 


Serves 4:         
2 tablespoons of yellow curry paste
2 onions roughly diced
1 medium butternut squash
500ml vegetable stock
200ml light coconut milk
75g red split lentils
2 yellow peppers deseeded and roughly chopped
140g frozen peas
100g bag of baby spinach
4 bread slices of your choosing
2 fat cloves of garlic

Method:
·         Prepare the butternut squash, you can peel the skin using a good peeler or carefully slice it off with a sharp knife. Cut down lengthways through the centre and using a dessert spoon, scoop out the seeds and stringy membrane, discard. Chop the squash into bite sized cubes and set aside.

·         In a large saucepan heat the curry paste on a medium/high heat, add a little water to stop it catching.
·         Add in the onions after a few mins and cook until softened. Add the butternut squash and cook for a further 5 mins (add a splash of water from time to time if needed).

·         To this add in the stock, coconut milk and lentils and bring to the boil then reduce the heat to a simmer and cook for 15 mins until the lentils are tender. Add the peppers and cook for a further 8 mins.
·         Stir in the peas and add the spinach to the top, cover with a lid and allow the spinach to wilt for about 2 mins, remove the lid and gently stir the wilted spinach leaves into the curry. Take the curry off the heat and allow to stand for a few mins with the lid back on.

·         In the meantime heat a dry griddled pan up to full heat. Drizzle the bread with a little olive oil on the cut side and place them face down on the hot pan, allow them to toast for 2 mins and remove them when toasted and marked with the lines of the pan. Cut a fat clove of garlic in half and run the cut side on the toasted side of the bread.


·         Once all breads are toasted and flavoured, serve with the curry.


Sunday, 1 February 2015

Mini Coffee and Walnut Cakes

Ok, so we have been good and having our healthier options for January... using good ingredients and eating a clean varied diet. Well now here is an indulgent recipe to treat ourselves, inspired from the Queen of bakes Mary Berry.

Mini Coffee and Walnut Cakes
I am making these into small cake tins (3 inch diameter- it makes around 8 of them) alternately they can be made into 8 inch sandwich tins.

150g unsalted butter softened
150g light brown sugar
3 medium eggs & 1 egg white
150g self-raising flour
1 teaspoon baking powder
1 tablespoon coffee extract
60g chopped walnuts

For the buttercream:
150g unsalted butter softened
450g sifted icing sugar
1 tablespoon coffee extract
2 tablespoons milk

Decoration:
200g chopped walnuts

Method
Preheat the oven to 180c. Line each tin with baking paper and line a baking sheet with baking paper.
In a large mixing bowl add in the butter, sugar, eggs, flour, baking powder and coffee extract and beat using an electric mixer until you have a smooth batter. Fold in the walnuts.
Pipe the batter into the cake tins, just over halfway full. Bake in the oven for about 18 mins until they have risen and the top springs back when lightly pressed with your finger.

Leave the mini tins for a few mins until cool enough to handle, turn out each cake, remove the baking paper and place them onto a wire cooling rack. Once cooled, trim off the top neatly and slice each cake in half.
Make the buttercream by beating the butter until nice and fluffy then sift in the icing sugar, beat until you have a smooth consistency (scraping around the bowl a few times) and blend in the coffee extract until well combined.

To decorate, once the cakes have cooled fully, sandwich the halves together using the buttercream (about a quarter of it). Spread a thin coat around the sides and roll each cake in the chopped walnuts to give an even coat.
Spoon the remaining buttercream into a piping bag with a medium nozzle and pipe on swirls of you choosing on top to finish off the cakes


Related Posts Plugin for WordPress, Blogger...